Monday, August 20, 2012

Use resource bundle messages files out of the classpath

Target audience for this post is have a little bit of experience in using resource bundle for localization in Java. Usually, you will have to put the relevant message files(Which contains key=value pairs) in the classpath and you will have to give the location when get the resource bundle object. For example, to get your Messages_en.properties file you implement following code.
Locale locale = new Locale( "en" );
String bundleBase = "myPackage.localizedMsgs.i18n.Messages";
ResourceBundle resourceBundle = ResourceBundle.getBundle( bundleBase, locale );
But in that case, if you wanted to do a change on any message you will have to rebuild the war file (if you are developing a web app) and deploy it. But I came across with a scenario where you need to keep message files out of the war and let user to do changes when necessary. Following example shows how to load such files on to the application context. Message files location is = ${catalina.base}/conf/messages/ so, the en message file will be, ${catalina.base}/conf/messages/Messages_en.properties Edit the catalina.properties file which is located in ${catalina.base}/conf/ directory. Add the folder location to the shared.loader parameter.
------file: catalina.properties-----

shared.loader=${catalina.base}/conf/messages/
Then the files in that location will be directly accessible on your application. Use following code and initialize the resource bundle with those files.
Locale locale = new Locale( "en" );
String bundleBase = "Messages";
ResourceBundle resourceBundle = ResourceBundle.getBundle( bundleBase, locale );
This was working perfectly for me. Thanks for reading.

Wednesday, September 29, 2010

Axis2 Java Web Services with NetBeans deployed on Tomcat

As we discussed earlier (previous post) you should set axis2 in to your tomcat web server.

Apply axis2 plugin

First you need to install "Axis2 Support" plugin to the net beans. Open the netbeans IDE and navigate to Tools -> Plugins. The plugins list will be displayed. If "Axis2 Support" is not showing there, please update the list.Then click the install button below and continue with installing...

Add apache web server to IDE

Ok, now our next task is to add apache to the netbeans IDE. To do that, go to the Services tab (or Window -> Services). Right click on servers and click "Add Server". It will popup following window. 
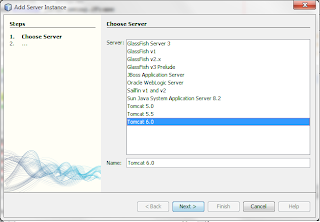
Select Tomcat 6.0 (according to your sever version) and continue.
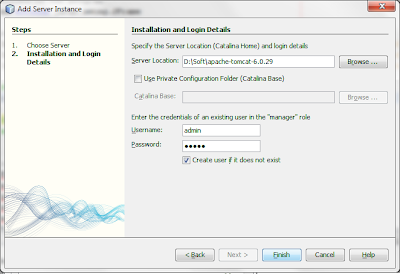
You should navigate the folder which you have been placed Tomcat server. Add username and password (in my case I just used admin/admin). Then you will appear new server like this, 
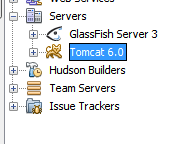
You can simply start server by right click on tomcat and selecting start option.

Setup .aar file creating directory

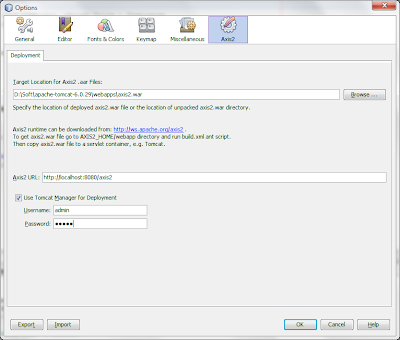
Go to Tools -> Options. And now you will be able to see an separate tab for Axis2 with its logo. Click on that.
Now browse to your axis2.war file for "Target Location for axis2 .aar files:" field. And tick on use tomcat manager for deployment, enter username and password which you set earlier (in my case admin/admin). Then click ok.

Creating Web Services

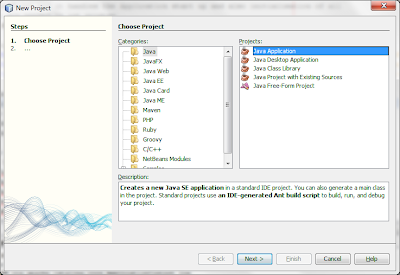
Open a new project (File -> New Project). Select Java and Java Application. 
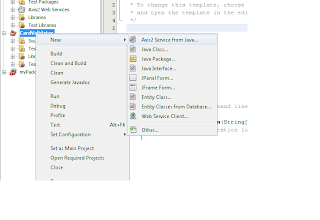
Add a desired project name (I used "CardValidator") and complete creating project. Then right click on newly created project and select New -> Axis2 Service From Java...
Then you will get popup window. There is nothing to change, in this case lets take this as Create Empty Web Service and click next. Then following step will visible. 
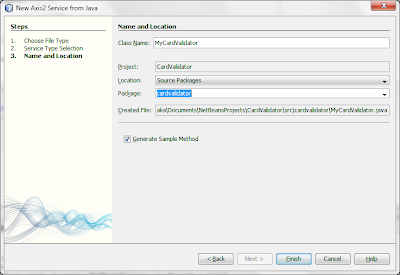
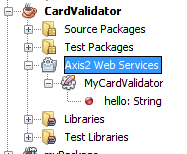
Give any name you wish as class name (in my case "MyClassValidator") and select package from list (in my case "cardvalidator"). And Finish it. Now its done. You will find a sample service call hello:String.
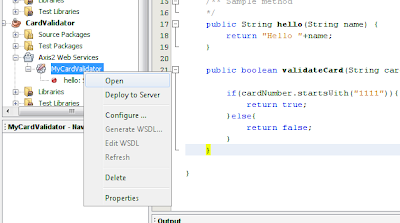
Important:You should right click on Axis2 Web Services and Deploy to Server, before test the sample program.
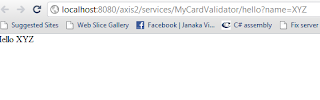
After that you can right click on hello:String and Test operation in browser. It will give following browser opening for your request.
Writing new methods is not a big deal.
Let's write a method to accept a card number and check whether it is valid one or not. If its starts with "1111" then its a valid card and should return true. Else should return false.
Simply write following java method on MyCardValidator class (which contains method hello as well)
public boolean validateCard(String cardNumber){

if(cardNumber.startsWith("1111")){
return true;
}else{
return false;
}
}

And now right click on MyCardValidator and deploy to server. 
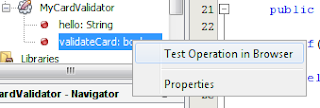
Then your new service method will appear as a service. You can right click on it and test it.
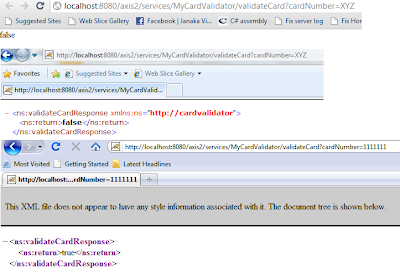
Then your browser will open with link like this "http://localhost:8080/axis2/services/MyCardValidator/validateCard?cardNumber=XYZ". By changing XYZ you can check whether your service works properly.
Note: If your default browser is IE or Firefox, then the output will looks like a XML message. If you used chrome, the output will just be text values.

By placing the axis2.war file in any tomcat server after you creating it you can access to the web services in above manner.
Hope you got it correctly. If you got any problems pleas feel free to contact me by mailing or commenting here.
Your comments will be very useful for further writings.... :)
Thank you for visiting. :)

Setup tomcat and deploy axis2

First you better download the Apache Tomcat server from here(direct download).
Extract the zip file where ever you want. Then set an environment variable named JAVA_HOME. Right click computer -> Properties -> Advanced System Settings -> Environment Variables. Select New on "system variables" part. Then give JAVA_HOME as variable name and give the jdk directory (e.g. C:\Program Files\Java\jdk1.6.0_01) for variable value.
Now Tomcat is set properly.
Then you can download Axis2.war file containing zip from here(direct download). Extract the zip and place the .war file in apache/webapps folder(e.g. C:\apache-tomcat-6.0.29\webapps\axis2.war). Now you can start up the tomcat server and see whether axis2 has been deployed successfully. Run startup.bat file in apache-tomcat-6.0.29\bin folder. Then tomcat will start, then type "http://localhost:8080/axis2/" on your web browser and check whether following web page display to you.

Run shutdown.bat in apache-tomcat-6.0.29\bin folder and server will be shutdown.
So now lets move to write web services, in this case I ll be using netbeans IDE and the server settings and all that will be done on it. Everything will be described step by step on next post.

Wednesday, September 22, 2010

Select all friends to send facebook inivtations

When you wanted to invite your all friends to a group or a event you just have to do a simple thing.
Just select Invite button and wait for loading the friends list....
After loading that, go to the address bar and type following and press enter.

javascript:fs.select_all();

Then all of your friends will be selected and you can invite all of them at once.... :)
Enjoy it...
Cheers..

Wednesday, February 3, 2010

Live news feeds on your web site (Local news at Sri Lanka)

Lanka News papers website http://www.lankanewspapers.com provides a simple and nice tool to publish news on your website. Add the following piece of code on your website to add this feature.
 <script language="javascript" src="http://www.lankanewspapers.com/news/RSS_Java.jsp">
</script>

<script language='JavaScript'>
SL_News_Display(
'10', // Number of headlines to show (Max 20)
'200', // Width of the news table
'font-family: helvetica, impact, sans-serif;font-size: 10pt;', // Font
'#FFFFFF', // Background color of news table
'1' // Border width
);
</script>


Reference:

Friday, January 1, 2010

Sony Ericsson Information Web Synchronize (Store, Edit, share your mobile life)

Hi all....
This will be really helpful you guyz for save your valuable information on you phone. For instance if you lost your phone all the information on your phone will be lost with this. But Sony Ericsson has introduce nice web synchronizing tool which creates a clone of the information on your phone with them. It will help you to get back your information.
It keeps,
  • Contacts
  • Calendar
  • Bookmarks
  • Notes
  • Tasks


What you have to do is visit http://www.sonyericsson.com/wportal/uss/promotion?cc=lk&lc=en and create your own account. And according to the instructions giving by the application setup your synchronizing account of your mobile phone. To that, go in your phone, Menu > Settings >Connectivity >Synchronization. Create new account and add settings For example synchronizing server will be http://sync.sonyericsson.com/sync/server. Like wise set your settings according to the instructions giving.
Then go to the created profile and start synchronizing.
It's still on Beta version. But it is working properly.