Apply axis2 plugin
First you need to install "Axis2 Support" plugin to the net beans. Open the netbeans IDE and navigate to Tools -> Plugins. The plugins list will be displayed. If "Axis2 Support" is not showing there, please update the list. Then click the install button below and continue with installing...
Add apache web server to IDE
Ok, now our next task is to add apache to the netbeans IDE. To do that, go to the Services tab (or Window -> Services). Right click on servers and click "Add Server". It will popup following window. Select Tomcat 6.0 (according to your sever version) and continue.
You should navigate the folder which you have been placed Tomcat server. Add username and password (in my case I just used admin/admin). Then you will appear new server like this,
 You can simply start server by right click on tomcat and selecting start option.
Setup .aar file creating directory
Go to Tools -> Options. And now you will be able to see an separate tab for Axis2 with its logo. Click on that.Now browse to your axis2.war file for "Target Location for axis2 .aar files:" field. And tick on use tomcat manager for deployment, enter username and password which you set earlier (in my case admin/admin). Then click ok.

Creating Web Services
Open a new project (File -> New Project). Select Java and Java Application. Add a desired project name (I used "CardValidator") and complete creating project. Then right click on newly created project and select New -> Axis2 Service From Java...
Then you will get popup window. There is nothing to change, in this case lets take this as Create Empty Web Service and click next. Then following step will visible.
 Give any name you wish as class name (in my case "MyClassValidator") and select package from list (in my case "cardvalidator"). And Finish it. Now its done. You will find a sample service call hello:String.
Important:You should right click on Axis2 Web Services and Deploy to Server, before test the sample program.
After that you can right click on hello:String and Test operation in browser. It will give following browser opening for your request.

Writing new methods is not a big deal.
Let's write a method to accept a card number and check whether it is valid one or not. If its starts with "1111" then its a valid card and should return true. Else should return false.
Simply write following java method on MyCardValidator class (which contains method hello as well)
public boolean validateCard(String cardNumber){

        if(cardNumber.startsWith("1111")){
            return true;
        }else{
            return false;
        }
    }
And now right click on MyCardValidator and deploy to server.
 Then your new service method will appear as a service. You can right click on it and test it.
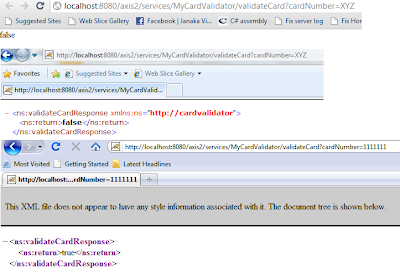
Then your browser will open with link like this "http://localhost:8080/axis2/services/MyCardValidator/validateCard?cardNumber=XYZ". By changing XYZ you can check whether your service works properly.
Note: If your default browser is IE or Firefox, then the output will looks like a XML message. If you used chrome, the output will just be text values.

By placing the axis2.war file in any tomcat server after you creating it you can access to the web services in above manner.
Hope you got it correctly. If you got any problems pleas feel free to contact me by mailing or commenting here.
Your comments will be very useful for further writings.... :)
Thank you for visiting. :)
